Unpacking and Preparing the R2 / R2 Pro
Unpacking the R2
- Inspect the packaging for any damage after receiving the R2.
- Contact the shipping company and document the damage when in doubt.
- Ensure all parts are included.
- Assemble and install the accessories.
- Run a quick mechanical Check once the R2 is placed in the desired location.
R2 Accessories Installation
A few preparation is required before the R2 is ready for use. Please follow the instructions to install the following parts:
- Control Housing
- Tryer
- Door Handle
- (Pro) Cooling Tray
Control Housing
- Unpack and Install the Control Housing.
- Fit the Control Housing to the stud on the Front Plate.
- Gently lift the Control Housing upward. The magnets will engage and secure the Control Housing.
- Tighten the Housing Screw (H2).
Tryer
- Unpack the Tryer from the Toolkit.
- Insert the Door Handle Screw into the Spoon, and then install the Wooden Handle.
Door Handle
- Unpack the Door Handle from the Toolkit.
- Insert the Door Handle Screw into the Handle, sparing around 6mm.
- Insert the Spacer.
- Screw the Door Hande onto the Door.
The R2 Pro Door Handle requires an additional Adapter. Check the Unboxing Video Guide for more information.
(Pro) Cooling Tray
- Unpack the (Pro) Cooling Tray.
- Place the (Pro) Cooling Tray underneath the Door.
- Locate and install the (Pro) Cooling Tray Cable to the top connector.
- Screw clockwise to secure the connection.
Mechanical Check
A mechanical check is crucial to prevent damaging the Drum and other mechanical parts. Always run a mechanical check after the Bullet has been shipped or moved to a different location.
The following list contains the required instructions for a mechanical check:
- Drum alignment
- Drum Pulley clearance
- Door Handle Screw Installation
Drum Alignment
- Level the R2
- Place the R2 on a level surface.
- Check Drum Position
- Push the Drum Shaft backward.
- Check if the Drum springs forward when you release your fingers.
- Align the Drum
- Pull the drum to the most forward position through the Door.
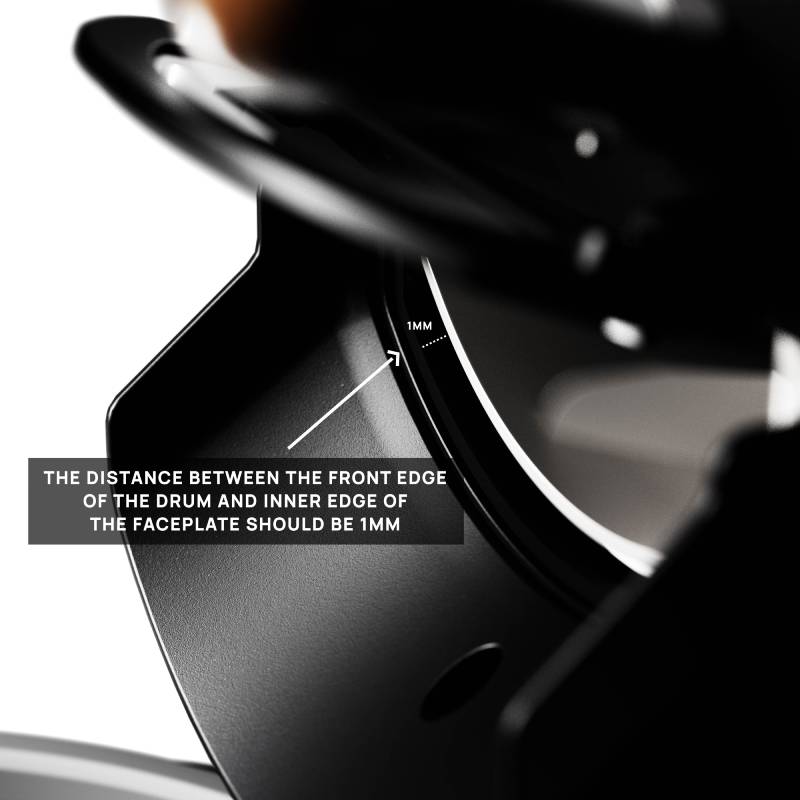
- Check the Drum-to-Front Plate clearance
- Ensure 1mm clearance between the Drum and Front Plate.
- Ensure 1mm clearance between the Drum and Front Plate.
Pulley Installation
- Remove the Chaff Collector
- Check Pulley Position
- Ensure the Pulley is correctly positioned between the Squirrel Cage and Body, not touching either side.
- Check Pulley Set Screw
- Gently spin the Drum clockwise to find the Pulley Set Screw.
- You might see two Screw-Holes with one Set Screw. This is normal and does not affect the functionality.
- Gently pull the Pulley outward to check if it's secure.
Door Handle Screw installation
- Follow the Unboxing Video Guide to install the Door Handle.
- Lift the Door and check that the Door Handle Screw is not protruding on the under side.
Power-On Test
- Plug in and power up the R2.
- Press the PRS Button three times to enter Roast Mode and then set Power to P0.
- Listen for any obvious metal-against-metal scraping sounds.
You might see some rust on the Drum, and this is perfectly normal. An unseasoned Drum can oxidize, and the oxidation will disappear during seasoning.
Seasoning the Drum
Before you can roast your first batch of coffee for consumption, you'll need to season your R2's Drum through three initial roasts. This process involves roasting 400-500 grams of green coffee beans to achieve the following:
- Seal the Drum's steel surface
- Prevent rust
- Create a smoother finish
While the seasoning process might not complete until after 5-10 roasts, you can enjoy your coffee after the initial three. You can use standard, everyday beans for the seasoning roasts; there's no need to use your premium coffees yet.
During seasoning, you can use a pot of water instead of the cooling tray:
- Fill a pot or container that fits under the R2 with water, about halfway full.
- Drop the roasted beans into the water once you're done roasting.
- Stir to cool the beans quickly.
Seasoning Instructions
Preheat
- Set the Preheat Temperature to 230°C and press the PRS Button to start preheating.TipAvoid setting the Preheat Temperature higher than 230°C as the IBTS Module will give a different measurement for non-seasoned Drums.
- Set the Preheat Temperature to 230°C and press the PRS Button to start preheating.
Start Roasting
- Press the PRS Button again to charge the R2 once the Preheat Temperature stabilizes at 230°C.
- The R2 will anounce, “I am now ready to roast.”
- Add green coffe beans (400-500g) to the Drum.
Check Drum Speed
- Make sure the Drum Speed is set to D9 for the fastest rotation.
- Adjust the Drum Speed if needed:
- Press F2 to access the D Settings.
- Press the Fan/Drum Buttons to increase the Drum Speed.
Adjust Fan Speed
- Press F2 to access the F Settings.
- Press the Fan/Drum Buttons to change the Fan Speed.Fan SpeedF3 is recommended in the beginning of the roast. If you feel that some moisture is building inside the Drum, you can set the Fan to a higher F setting.
Roasting Process
- Roast the coffee beans on Power Settings P7 until they reach the second crack.
Cooling the Beans
- Press the PRS Button to go to Cooling Mode.
- Open the door and dump the beans.
Repeat
- Repeat this process at least three times to season the drum.
⚠️ IMPORTANT NOTICE ⚠️
- Do not consume the beans from the seasoning roast! Machine oil does not taste good!
- For the first 10 roasts, set the Drum Speed to D9. This higher speed helps prevent beans from sticking and potentially forcing the Door open.
- After the initial seasoning period, you can lower the Drum Speed as the Drum surface becomes smoother.